

How To Create Makeup Strokes In Adobe
This chapter is from the book
Unleashing the Power of Brushes
Each version of Illustrator brings new features and tools to the hands of designers. Some are absurd effects, and some add useful functionality. And every in one case in a while, a feature is introduced that is so unique and powerful that information technology changes everything. The brushes in Illustrator are such a feature.
The concept is simple: Instead of cartoon a predictable, ho-hum line using the Pencil tool, the Paintbrush tool tin can create flourishes, lines with tapered ends, and cocked elements that mimic the strokes you can create with Speedball or calligraphy pens. More powerful than you might remember, brushes back up pressure-sensitive tablets and can fifty-fifty distribute art and patterns along a drawn path. By using brushes, you can streamline your work by creating circuitous artwork with simply a few paths. Brushes are also like shooting fish in a barrel to modify.
Under the hood, the Paintbrush tool functions exactly like the Pencil tool and allows y'all to click and elevate to create a vector path. The deviation is in the appearance of the path it creates. The Paintbrush tool applies predefined vector artwork to the paths you draw. When using a pressure-sensitive tablet, yous can besides control how the artwork is practical to the vector paths.
Exploring the Illustrator Castor Quartet
Illustrator has four kinds of brushes; each offers a different kind of behavior in which art is practical to a path:
- Calligraphic castor. The Calligraphic brush allows you to ascertain a nib, or tip, of a pen. The art that is drawn with a Calligraphic castor takes into account the bending and shape of the nib, resulting in natural thicks and thins and variable thickness (Figure 4.21).

Effigy 4.21 With the help of a force per unit area-sensitive tablet, the Calligraphic brush can create strokes with natural thicks and thins to accomplish a hand-drawn wait and feel, equally in this illustration of a skier.
- Scatter castor. The Scatter brush allows you to ascertain any vector art every bit a brush (except the ones listed in the sidebar "What's in a Brush?"). The art that is fatigued with a Besprinkle brush consists of copies of the art, scattered across the vector path. Y'all can control the way art is scattered in each brush's settings (Figure 4.22).
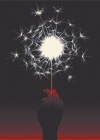
Figure four.22 You lot tin use a Scatter castor to create consistent borders or to quickly fill an analogy with random art, such as the sparkles in this analogy.
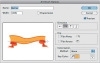
- Art brush. The Art brush allows you to define whatsoever vector fine art equally a brush (except the ones listed in the sidebar "What's in a Brush?"). The fine art drawn with an Art castor is stretched across the unabridged length of the path, resulting in the controlled baloney of fine art along a vector path (Figure 4.23).

Figure iv.23 You lot can utilise an Art brush to apply artistic brush strokes or to stretch fine art forth a path.
- Pattern brush. The Pattern brush allows you to specify upwardly to v already-defined patterns as a brush. The art that is drawn with a Design brush is distributed forth a vector path based on the castor'south settings, resulting in perfect corners and art that is contoured to the vector path (Figure iv.24).
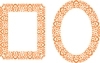
Figure 4.24 A Blueprint brush can bend fine art to match the curve of a path and can also contain a variety of settings that change based on the makeup of the path.
Applying Castor Strokes
To paint with a castor, choose the Paintbrush tool in the Tools panel, so select a brush from the Brushes panel. You create brush strokes the same way you create paths with the Pencil tool, so once you've selected a brush to use, click and drag on the artboard to ascertain a path. When you lot release the mouse push button, Illustrator applies the brush stroke to the newly created vector path (Figure 4.25). Illustrator also indicates the applied brush stroke in the Appearance panel, making information technology easy to identify when a particular castor has been used (Figure four.26).

Effigy 4.25 When y'all create a brush stroke, a single vector path is divers, and the appearance of that path displays the castor art.
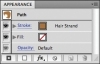
Effigy iv.26 By identifying the brush applied to a path, the Appearance panel gives nevertheless another reason for why information technology should always be open and visible on your screen.
You don't take to use the Paintbrush tool to employ a castor stroke to a vector path. Simply selecting a vector path and clicking a castor in the Brushes panel applies the brush to the selected path. The merely do good you proceeds by using the Paintbrush tool is the ability to define a castor shape using a pressure level-sensitive tablet (see the sidebar "Can You Handle the Pressure?").
Defining a Calligraphic Brush
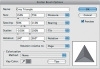
To ascertain a new Calligraphic brush, click the New Brush icon in the Brushes console, or choose New Castor from the Brushes panel menu. Select New Calligraphic Castor in the New Brush dialog box, and click OK to open the Calligraphic Brush Options dialog box (Figure 4.27).
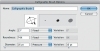
Effigy 4.27 The Calligraphic Brush Options dialog box lets you click and drag the neb shape in the preview area to define its settings.
The Calligraphic Brush Options dialog box allows yous to specify the shape and behavior of the nib using three settings:
- Angle. You lot can set the angle of a Calligraphic castor to a fixed angle or to a random number. When the Roundness setting is gear up to 100%, the Angle setting does not produce any noticeable modify in the shape of the brush. With pressure-sensitive tablets, you tin can fix the angle to change based on pressure, stylus wheel, tilt, bearing, or rotation. When you're non using the Stock-still option, the Variation slider allows y'all to specify a range that the bending tin can change, which you lot can also see in the preview area of the dialog box.
- Roundness. You can set the roundness of a Calligraphic brush to a stock-still or random number. When the roundness is prepare closer to 100%, the tip of the nib becomes circular in shape (like a traditional ink pen). When the roundness is ready closer to 0%, the tip of the nib becomes flat (like a traditional calligraphy pen). With pressure-sensitive tablets, y'all can set the roundness to change based on pressure, stylus wheel, tilt, bearing, or rotation. When you're not using the Stock-still choice, the Variation slider lets you lot specify a range that the roundness tin change, which y'all tin also see in the preview surface area of the dialog box.
- Diameter. You lot can set the diameter, or size, of a Calligraphic brush to a stock-still or random number. With pressure-sensitive tablets, you can gear up the bore to change based on pressure level, stylus wheel, tilt, bearing, or rotation. When yous're not using the Fixed option, the Variation slider allows y'all to specify a range that the diameter tin can change, which you lot tin likewise come across in the preview area of the dialog box.
Defining a Scatter Brush
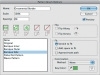
To define a new Scatter brush, start by creating the art for the brush on the artboard. One time it is complete, drag the artwork straight to the Brushes panel. Alternatively, you can select the art and click the New Brush icon in the Brushes panel or choose New Brush from the Brushes panel menu. Select New Scatter Brush in the New Brush dialog box, and click OK to open the Scatter Brush Options dialog box (Figure four.28).
Effigy 4.28 The Scatter Brush Options dialog box presents a plethora of settings you can use to create a broad variety of results.
You can fine-tune the Besprinkle brush with the following settings:
- Size. The Size setting tin be a stock-still or random number; this setting determines how big or small-scale the fine art is fatigued on the path, relative to the bodily size of the art used to define the castor. For case, if you lot create a pattern that is one inch tall and use it to define a Scatter brush, a Size setting of 50% results in a Scatter brush that creates designs that are .v inches alpine. With pressure-sensitive tablets, you can set up the size to change based on force per unit area, stylus bike, tilt, begetting, or rotation. When you are not using the Fixed pick, the two values determine the range that the size can modify.
- Spacing. The Spacing setting can be a stock-still or random number; this setting determines the corporeality of space that appears betwixt each instance of art that is drawn on the path. Higher values add more space between each copy of the art, and lower values make the copies of fine art appear closer together. With pressure-sensitive tablets, y'all can set the spacing to change based on pressure, stylus bike, tilt, bearing, or rotation. When you're not using the Fixed pick, the two values decide the range that the spacing tin modify.
- Scatter. The Besprinkle setting tin can be a stock-still or random number; this setting determines how far abroad each instance of fine art that is drawn deviates from the path. Negative values shift art lower and to the left of the path; positive values shift fine art higher and to the right of the path. With force per unit area-sensitive tablets, you tin can fix the scatter to modify based on pressure, stylus wheel, tilt, bearing, or rotation. When you're not using the Stock-still choice, the 2 values determine the range that the scatter can change.
- Rotation. The Rotation setting can be a stock-still or random number; this setting determines the angle that each instance of fine art is drawn on the path. With pressure-sensitive tablets, yous can set the rotation to modify based on pressure level, stylus bicycle, tilt, begetting, or rotation. When you're not using the Fixed selection, the two values determine the range that the rotation tin change.
- Rotation relative to. You tin ready the rotation so that it is relative either to the page, in which case all instances of the art announced consistent, or to the path, in which example all instances of the art rotate in accordance with the direction of the path (Effigy 4.29).

Figure 4.29 Depending on your desired upshot, you can specify art to rotate in relation to the page (tiptop) or the path (bottom).
- Colorization. The Colorization option lets you choose from one of four settings. If you choose the None setting, the Scatter brush creates fine art in the aforementioned color that is used to define information technology. If you lot choose the Tints setting, the Scatter brush creates art in varying tints of the current stroke colour. If y'all choose the Tints and Shades setting, the Besprinkle brush creates fine art in varying tints of the current stroke color while preserving blackness objects. If yous cull the Hue Shift setting, the Besprinkle brush creates art and changes the key color of the fine art to the current stroke color. To define a key colour, click the Eyedropper icon in the dialog box, and click part of the art in the preview area.
Defining an Fine art Brush
To define a new Fine art brush, start by creating the fine art for the castor on the artboard. In one case information technology's complete, elevate the artwork directly into the Brushes panel. Alternatively, you lot tin select the art and click the New Castor icon in the Brushes panel or choose New Castor from the Brushes panel menu. Select New Art Brush in the New Brush dialog box, and click OK to open the Art Brush Options dialog box (Figure 4.30).
Effigy iv.30 The Art Castor Options dialog box gives you a visual preview of the direction of the fine art in relation to the path.
Yous can fine-tune the Art brush with the following settings:
- Direction. The Direction setting determines the orientation of the art with respect to the path to which the brush is applied. A blue arrow appears in the preview area, allowing you to visually empathise how the art will exist drawn on a path.
- Width. The Width setting determines how large or minor the fine art is fatigued on the path relative to the actual size of the art that was used to define the castor. For example, if you create a design that is one inch tall and utilise information technology to define an Fine art castor, a Size setting of l% results in an Art brush that creates designs that are .5 inches alpine. When specifying width values, y'all can also choose to keep the artwork scaled in proportion.
- Flip. The Flip Along and Flip Across settings enable you to reflect the artwork on both the horizontal and vertical axes.
- Colorization. The Colorization pick lets you choose from one of iv settings. When you choose the None setting, the Art brush creates fine art in the same color that is used to define information technology. If you cull the Tints setting, the Art brush creates art in varying tints of the current stroke color. If you choose the Tints and Shades setting, the Art brush creates art in varying tints of the current stroke color while preserving blackness objects. If you lot choose the Hue Shift setting, the Art brush creates fine art and changes the primal color of the fine art to the electric current stroke color. To define a key color, click the Eyedropper icon in the dialog box, and click part of the art in the preview expanse.
Defining a Pattern Brush
To define a new Pattern brush, it's easier to offset define the design swatches that volition be used in the brush (defining blueprint swatches is covered in Chapter six, "Coloring Artwork"). A Pattern castor tin can contain up to five unlike pattern tiles, which are used for different parts of a path (see the "Pattern tiles" bullet in the post-obit list). Once you've defined the necessary pattern swatches, click the New Brush icon in the Brushes panel, or choose New Brush from the Brushes panel carte. Select New Pattern Brush in the New Brush dialog box, and click OK to open the Blueprint Castor Options dialog box (Figure 4.31).
Effigy 4.31 Though it might announced complicated at showtime, the Blueprint Brush Options dialog box makes information technology piece of cake to define powerful Pattern brushes.
The various settings of the Design Brush Options dialog box are as follows:
- Scale. The Scale setting determines how big or small-scale the pattern swatch is drawn on the path, relative to the actual size of the art that was used to define the pattern (by default, a Pattern brush applies art at the size the art was originally created). For example, if you create art that is 1 inch tall and use it to define a pattern swatch, a Scale setting of 50% results in a Pattern brush that creates tiles that are .5 inches alpine.
- Spacing. The Spacing setting determines the corporeality of space that appears between each pattern tile that is drawn on the path. By default, all pattern tiles bear upon each other, and specifying higher values adds more than space betwixt them.
- Design tiles. A Pattern castor tin use upwards to five pattern tiles for the different parts of a drawn path. The side tile is used forth the middle of the path, the outer and inner corner tiles are used whenever the path encounters a corner ballast bespeak at ninety degrees, and the offset and end tiles are used at the commencement and end of an open path. Nosotros'll embrace each tile type in detail later on in this chapter. To set up a tile, click the preview box to a higher place each tile, and choose from the list of defined design swatches that appears. Only pattern swatches from the current document appear in the listing. It is not necessary to assign a pattern swatch to every tile in order to ascertain a Blueprint brush. For instance, some Blueprint brushes do not have start or end tiles divers.
- Flip. The Flip Along and Flip Across settings enable you lot to reverberate the design tiles on both the horizontal and vertical axes.
- Fit. The Fit setting, arguably one of well-nigh powerful settings among all the brushes, allows you to specify how design tiles are fatigued on a path. The "Stretch to fit" option modifies the brush's Calibration setting to ensure a perfect fit across the unabridged path, with no spaces between tiles. The "Add space to fit" option modifies the castor'south Spacing setting to ensure the tiles fit evenly beyond an entire path. The "Approximate path" option actually changes the size of the path and so that it fits to the size of the pattern tiles.
- Colorization. The Colorization selection lets y'all cull from i of 4 settings. When you choose the None setting, the Pattern castor creates tiles in the same color used when the design swatches are defined. If you choose the Tints setting, the Pattern brush creates tiles in varying tints of the electric current stroke colour. If you choose the Tints and Shades setting, the Blueprint brush creates tiles in varying tints of the current stroke color while preserving blackness objects. When you choose the Hue Shift setting, the Blueprint brush creates tiles and changes the cardinal color of the tiles to the current stroke color. To define a key color, click the Eyedropper icon in the dialog box, and click role of the tile in the preview area (which is extremely difficult considering how pocket-size the previews for each tile are).
These next options permit you define the 5 parts of a Blueprint brush. Pattern brushes comprise upwards to five different individual design tiles: side, outer corner, inner corner, start, and end. It's rare you lot would define a single Pattern brush with all five of these types of tiles, though, because the corner tiles are mostly beneficial when creating borders, which are closed paths and therefore have no need for start or end tiles. Likewise, Pattern brushes with outset and end tiles are mostly practical to open paths that may not require corner tiles.
- Side tiles. The most common type of tile used, the side tile simply repeats itself along the path to which it is applied (Figure four.32).

Effigy 4.32 This is a Pattern brush comprised of just a side tile (inset) to simulate stitching as it might appear on a baseball. The stitches follow the profile of the path and appear seamless.
-
Outer corner and inner corner tiles. The terms inner corner and outer corner refer to the corners of a clockwise path. On such a path, the corners that point outward will use the outer corner tile, and the corners that bespeak inward will use the inner corner tile. On counterclockwise paths, these roles will be reversed.
If a rectangle is created past dragging information technology from superlative left to bottom right, or vice versa, the top of the rectangle runs from left to right, and all corners will employ the outer corner tile. If the rectangle is drawn by dragging between the top-right and bottom-left corners, then the bottom of the rectangle runs from left to right. Thus, the brush pattern as displayed along the top of the rectangle will be upside down, and all corners will use the inner corner tile (Figure four.33).
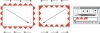
Figure 4.33 The arrows that announced inside the rectangles indicate the direction in which they were drawn, while the arrows that appear along the outside of the rectangles point the direction the paths run in. The rectangle on the left runs clockwise and uses the outer corner tile, while the rectangle on the right runs counterclockwise and uses the inner corner tile.
- Commencement and terminate tiles. Start and cease tiles appear, respectively, at the beginning and finish of an open path. If a brush does not have start or finish tiles defined, then the side tile will be used instead. Note that if a brush doesn't accept inner or outer corner tiles defined, those sections of the path volition appear blank.
A few things are somewhat disruptive with regard to how Illustrator displays blueprint tiles in the user interface. For example, the tiles appear in one particular order when listed in the Pattern Brush Options dialog box (Figure 4.34), still they announced listed in a completely different society when viewed in the Brushes panel (Figure 4.35). Although the order doesn't actually brand a deviation, it's easy to get dislocated when you're assigning patterns to each tile.
Figure 4.34 The order in which Pattern brushes announced within the Pattern Brush Options dialog box. A diagonal line (slash) ways in that location is no pattern specified for that tile.
Figure 4.35 The order in which Blueprint brush tiles appear within the Brushes panel.
In addition, because of the fashion inner corner tiles are drawn along paths, they are flipped (or reflected) –45 degrees, which means you need to compensate for that when defining the artwork for such tiles. It gets confusing considering the Brushes panel shows a preview of the tile as though it appears correct, just the same tile appears reflected when viewed in the Pattern Castor Options dialog box (Effigy 4.36). And then that you remain sane, it's best to draw your pattern art normally and just reflect information technology 45 degrees before defining it as a pattern.

Effigy iv.36 In the Pattern Brush Options dialog box, the inner corner tile appears flipped, compared to the same tile that appears in the Brushes panel (inset).
Modifying Brush Strokes
Double-click any brush in the Brushes console to specify or alter its settings. Alternatively, y'all can hold the Option (Alt) fundamental while dragging vector fine art from the artboard onto an existing Fine art or Besprinkle brush to modify or replace the brush. When you do, a thick black line appears effectually the brush icon indicating that you are virtually to alter information technology.
When you're about to modify a brush, Illustrator checks to see whether the existing castor has already been applied to objects in your document. If it finds such objects, Illustrator asks whether you want the existing paths to now take on the advent of the modified brush or whether yous want to leave them intact (Figure 4.37). If yous want to exit them intact, Illustrator makes the change just to the selected objects.
Figure iv.37 Always watching what you're doing, Illustrator alerts y'all if your edits volition impact objects that have already been drawn.
You tin delete brushes from a document past dragging them to the trash can icon in the Brushes panel.
Expanding Brush Art
When you employ a brush stroke to a path, only the vector path is editable. The fine art that makes up the brush stroke cannot be edited or otherwise tinkered with. However, you can hands reduce any brush stroke to editable vector art by choosing Object > Aggrandize Advent. Doing so removes the link to the brush, and the path no longer updates if the brush swatch is updated (Figure four.38).
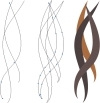
Figure 4.38 When viewed in Outline mode, brush strokes appear as open paths (left). In one case expanded, the paths form closed shapes that can be edited as needed (center). In Preview mode, however, live and expanded brush strokes appear identical (right).
Additionally, yous can always access the original art that was used to create an Fine art, Besprinkle, or Pattern brush by dragging the castor from the Brushes panel to a blank area on the artboard.
Source: https://www.peachpit.com/articles/article.aspx?p=1317223&seqNum=3
Posted by: wolfewhisce.blogspot.com
0 Response to "How To Create Makeup Strokes In Adobe"
Post a Comment